
Have you already spring-cleaned your beauty stash and taken your third shower of the day? If the #MCO (3.0) has got you feeling restless and missing your regular #TreatThyself manipedi sessions, not to worry. Dressing your nails up isn’t that difficult for the nail art beginner—all you need are everyday essentials that are already lying around at home.
From toothpicks and bobby pins to sponges and Sharpie pens, there are some nifty tools of the (DIY) trade that you can utilise for your favourite nail ideas:
#1: Work with what you already have
Got more than enough nail polishes from the same colour family for a tonal look? Bring it on. Recreating this Instagram trend is easy and achievable at home—exactly what we like to hear. Just paint a different colour onto each nail for that monochromatic-chic look, or deploy a few of your pastels to brighten up your mood. The best part about this? Fuss-free, and really, there’s no better way to utilise your nail polishes all at one time.
#2: Sponge it up
Calling all glitter lovers: Have you considered gradient nail art yet? If there’s one thing that our DIY nail sessions have taught us well, it’s that the best way to sport glittery nails without looking like an OTT, sparkly hot mess is to keep it to your tips. Also, a little subtlety can go a long way.
Drag the nail polish brush in a horizontal line over your nail tips and gently draw it upwards towards your nail bed to scatter glittery specks over the middle and top. If that doesn’t work for you, you could try coating a small piece of sponge with glitter nail polish in a narrow strip, then press it over your tips—this tutorial best illustrates how to do it yourself.
#3: Use a toothpick
Toothpicks are perfect tools to create the daintiest of nail art such as hearts, stars, and the like. Drop two coloured dots on your nail with a toothpick, connect both in the middle, and pull it down to create a heart. This tutorial is perfect for anyone looking for subtle nail art motifs to recreate.
#4: Sharpies are great for metallic details
Metallic stripes can be a pain to draw if you aren’t very familiar with a nail brush, but if you’ve got a Sharpie lying around your workstation, you’re pretty much set!
Paint your nails with a base colour first and let it dry completely before drawing fine lines with a Sharpie (gold or silver will work perfectly in this case). If your lines end up a little wonky, you can either give up and just let it happen, or you can use a little rubbing alcohol on a cotton pad to clean them up before re-drawing. After you’re done, spritz hairspray and wait for a few minutes to let the metallic lines dry.
TIP: Don’t forget to top coat!
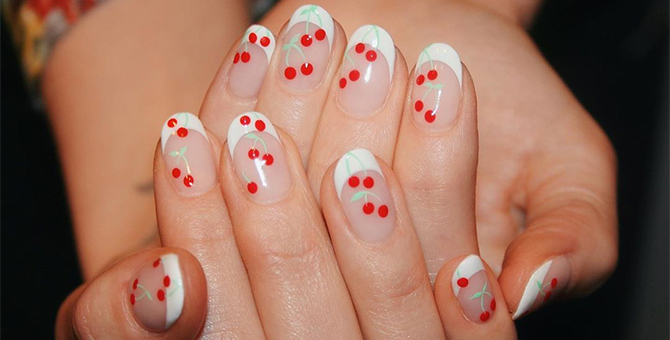
#5: Bobby pins are your new nail brushes
Those dratted pins that you misplace so often are the easiest tools to use to create a variety of motifs on your nails. Whether cherries, retro-inspired polka dots, or even a leopard-print motif, bobby pins are actually super handy to have if you don’t have fine-tipped nail brushes at your disposal. Check this video tutorial out on how you can create seven different nail ideas.
Find more nail art inspo here.
| SHARE THE STORY | |
| Explore More |


