Beauty Diaries: HELP! My blonde hair has turned purple—what do I do?
BURO Beauty Troubleshoot

Beauty Editor Red’s blonde ambitions have turned into every girl’s worst nightmare—an overprocessed, overtoned mess. Here’s how she fixed it.
If you were me earlier this week, fresh from a bleach appointment gone wrong, I’d like to send my condolences. Long story short, I went to get my roots topped up to a nice, clean platinum blonde, and while that’s exactly what I got, I also left with an additional purple splotch around the mid-lengths of my hair.
Now, this wouldn’t normally be a huge problem—I’d simply just play the waiting game until it faded over the next few washes. However, I had a shoot coming up in two days, which meant that if I couldn’t kick the splotchy purple, it would be immortalised forever on camera. So, I did what any rational person would do: panic, call my best friend to ask her advice, look in the mirror and scream, and—after I calmed down—finally sit down to strategise.
Logically, it wasn’t that big a deal—toner always washes out eventually. However, the added time crunch proved to be an issue. Plus, my hair was already fried, so washing it again would be a very taxing process on my strands. So, the only course of action was to figure out how to speed up the fading process and condense it into just two days—without completely destroying the integrity of my tresses. That said, the cameras were closing in so I had no choice but to just make it up as I went along.
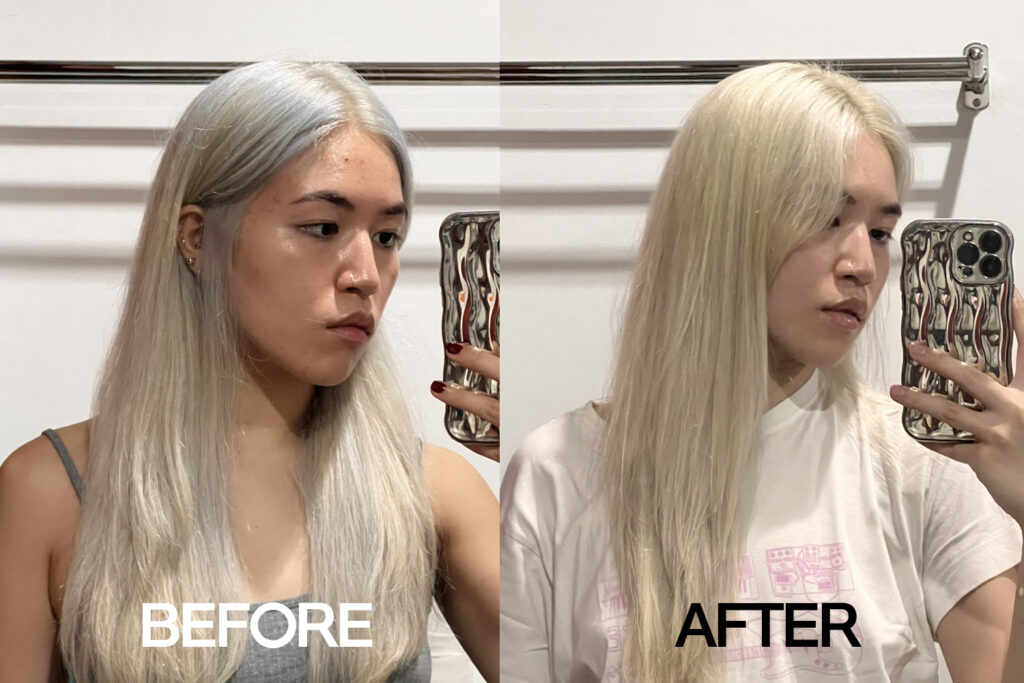
Ahead, find out exactly what I did to take my hair from this (L) to this (R):

Step 1: Assess the situation
From what I could see, the colour of my roots and my ends were perfect—it was literally just the middle section that was suffering. So, I knew that I just had to target my treatment where it was needed. That helped me plan out the rest of the steps in my journey back to blonde.
Step 2: Mask up
To protect my ends and roots from any further damage, I used the Fekkai Shea Butter Miracle Intense Moisture Hair Mask generously over my damp hair. This would help to work as a barrier against any stripping suds and prevent any further damage to my tresses.
Step 3: Apply a clarifying shampoo
Since I was looking to strip the colour in such a short period of time, I knew that the shampoo I used would have to be sudsy. Hence, I opted for a clarifying shampoo that would work overtime to break down that toner pigment as much as possible. I used the Olaplex No. 4C Bond Maintenance™ Clarifying Shampoo on the purple bits only, taking care to work and lather it up generously for a full five minutes. I rinsed and repeated the process two more times, and by the end, while I could see that there was still some purple, my hair was feeling very brittle so I opted to leave it and hope for the best when it dried.
View this post on Instagram
Step 4: Deep condition my hair
At this point, my hair and scalp just needed time to recuperate, so I rinsed the shampoo thoroughly, gently towel-dried it with a microfibre shampoo and worked a generous amount of Briogeo’s Be Gentle, Be Kind Avocado + Kiwi Moisture Superfood Mask through my roots and ends (normally, I’d just keep the mask to the mid-lengths and ends, but my hair was super dry after all the toning and bleaching from my appointment). Then, I put my hair up in a shower cap and left that to marinate for a few minutes before rinsing.
Step 5: Heat protectant and styling!
Now, because my hair was so overprocessed, I needed to get it bone dry ASAP. PSA: Wet, processed hair is extremely fragile and prone to breakage, especially when it’s as white as mine. So, after misting my hair with a heat protectant, I whipped out my trusty Dyson Supersonic and started blasting low heat at my roots. Note: I did not detangle my hair until it was at least 80 per cent dry to avoid extra breakage.
Once my hair was pretty much dry, I then assessed the situation. Yes, it was still purple, but it was a marked improvement from the before—so, I decided to wait until the next day to repeat the process on just the front, face-framing section of my locks (AKA the bits that would be seen the most).
Until I could get back in with another round of clarifying shampoo, I lathered my locks in two kinds of heat-protecting, bond-repairing oils from the root to the ends—the Schwarzkopf Professional Bonding Light Oil and the Virtue Labs Repairing Oil. This would hopefully tide my hair over and restore some of the life and strength back into the strands before my next wash. Then, I styled it straight with the new Dyson Airstrait to avoid any tangles (and unnecessary damage).
The takeaway
Once all was said and done and the top layer of my hair was hit with round two of this routine, I was back to a (relatively) clean blonde. It’s not perfect but it’s the best I could do in a pinch—and it worked well enough that the purple didn’t show up on camera. Preferably, however, you’d avoid this happening in the first place—when it comes to maintaining blonde, it’s so important to go to a stylist and salon that knows exactly what they’re doing, lest you risk a bad colour job or losing all your hair altogether. If I had just gone to a stylist I trusted instead of risking it in a YOLO moment of weakness, I could have saved myself a lot of breakage and a lot more trouble.
Finally, if this routine does not work for you and you’re under a deadline too, it’s time to whip out the temporary dye and just lean into the chaos! Go for pastel colours like pink or purple to even out your hair colour and hide the splotchiness—better yet, they fade out really quickly and allow you to eventually return to a clean (purple-less) blonde. Either way, I wish you good luck and a great hair day.
For more Beauty Diaries, click here.
| SHARE THE STORY | |
| Explore More |


