

Food creative Rachel Khoo—who’s British by birth and half-Malaysian on her father’s side—has a way with food and words. Watching her cook feels like hanging out in your friend’s kitchen, while hearing her adventures with food is akin to having a chat with that especially well-travelled pal who’s a foodie. A highly knowledgeable one, who trained at Le Cordon Bleu in Paris and turned her tiny Parisian apartment into the city’s smallest restaurant.
In Rachel Khoo’s Chocolat, she takes inspiration from around the globe for her mouth-watering creations. The experience includes meeting some of the finest chocolatiers in Europe, investigating the fascinating history of chocolate, and exploring its health and wellbeing benefits (spoiler: it’s not just a guilty pleasure).
In every episode, she shares delightful sweet and savoury recipes ranging from humble comfort foods to sophisticated sweet treats. Discover Rachel’s tips for classic favourites such as fondants, truffles and mouses, to surprising twists on tacos, tomato pasta sauce, and steak and chips.
Below, we’re sharing ≠≠–≠≠. With detailed instructions, you’ll find yourself mastering them in no time—and making them again and again.
Rachel Khoo’s Chocolat airs every Friday, 7:30pm on StarHub channel 432 and BBC Player.
Cacao chilli crisp with noodles and pak choi
Makes: 500g jar of chilli crisp
Preparation time: 30 minutes
Resting time: 30 minutes
Cooking time: 10 minutes
Vegan and gluten-free
Ingredients
1 dried Ancho chilli
1 dried Chipotle chilli
3 tbsps Sichuan peppercorn
3 tbsps Cacao nibs
60g Salted peanuts
25g Dried chilli flakes
2 tbsps Sea salt flakes
2 tbsps Caster sugar
30g Fresh ginger
4 Shallots
500g Peanut oil
2 Pak choy
150g Flat rice noodles
2 tbsp Chilli crisp
2 tbsp Chinese black vinegar
2 tbsp Soy sauce
To garnish:
Thinly sliced spring onions, thinly sliced chilli, thinly sliced radishes, julienned carrot
Method
1. Take the stem off the ancho and chipotle chilli and blitz with the Sichuan peppercorns in a spice grinder until a fine powder. Add this to a large heatproof bowl.
2. If your cacao nibs are still rather whole, crush them with a pestle and mortar or use the spice grinder to blitz a little further. You want to retain a bit of their texture, like a chunky peanut butter.
3. Do the same with peanuts.
4. Add cacao nibs and peanuts to the bowl with the chillies. Mix in the chilli flakes, sea salt and sugar.
5. Peel the fresh ginger using a spoon and then slice into 2mm slices. Cut the slices into 2mm matchsticks that are roughly a centimeter long. Add these to the bowl.
6. Peel the shallots and finely slice into 2mm thick slices. Add them to a large pot with the oil. Place this on a medium hot heat. Stir continuously until the shallots start to get a light golden colour.
7. Use a slotted spoon to remove the shallots and place into a separate bowl. Take the oil off the heat and pour it into the bowl with the chillies.
Tip: Be careful as the oil will bubble up (that’s why it’s important to use a large bowl) and gently stir so not to get any splashes of hot oil on yourself.
8. Leave to cool for 30 minutes before adding the crisp shallots. Once the mix is completely cool you can add them to a jar and keep in the fridge. It’ll keep for a month.
To serve
1. Halve the pak choy, add to a non-stick frying pan cut side down with drizzle of oil. Allow to heat up and once it sizzles cover and cook for 3-5 minutes until the pack choy is soft.
2. Cover the noodles with boiling water in a heatproof bowl and allow to soak until soft (or prepare according to the directions on the packet).
3. Drain, rinse with cold water and add to the frying pan.
4. Remove from the heat and toss together with the chilli crisp, vinegar and soy sauce.
5. Dish up into 2 bowls and serve with your choice of garnishes.
“I’ve had chilli crisp sauce a few times in various Chinese restaurants, but it wasn’t until recently I actually knew it’s super easy to make it at home. It’s now become a must-have ingredient in my fridge as it lends itself to putting on everything from fried eggs, cheese on toast, roasted veg, steamed fish… anything which is a bit dull and could do with a kick.
“Cacao nibs are not a traditional ingredient but they actually work extremely well they give the condiment a satisfying crunch (which peanuts do as well, but they go slightly soft when sitting in the fridge for too long) and depth in flavour.”
Some other ideas on how to use this condiment:
- Stir it into noodles with vinegar and soy sauce for a simple dressing.
- Use it in salad dressings or for seasoning steamed vegetables.
- Add to stir fries. Spoon over noodle soups.
- Drizzle over fried eggs or scrambled eggs for an easy way to make breakfast more interesting.
- Spoon into tacos, drizzle on hummus or pizza, mix with mayo + spread on your burger bun
Rachel’s tips:
- Mix up the spicing here to fit your flavour preferences. You can add more spicy chilli flakes/ use different types of dried chillies for more heat and different flavours. Add fennel seed, star anise, cinnamon stick, cardamom, cumin seeds for a different flavour profile. You can also fry sliced garlic in the oil until golden.
- You can make the chilli crisp ahead of time and store in a jar in the fridge for up to one month.
- This makes a lot of chilli crisp so it’s great to make a big batch and divide into smaller jars to gift to people.
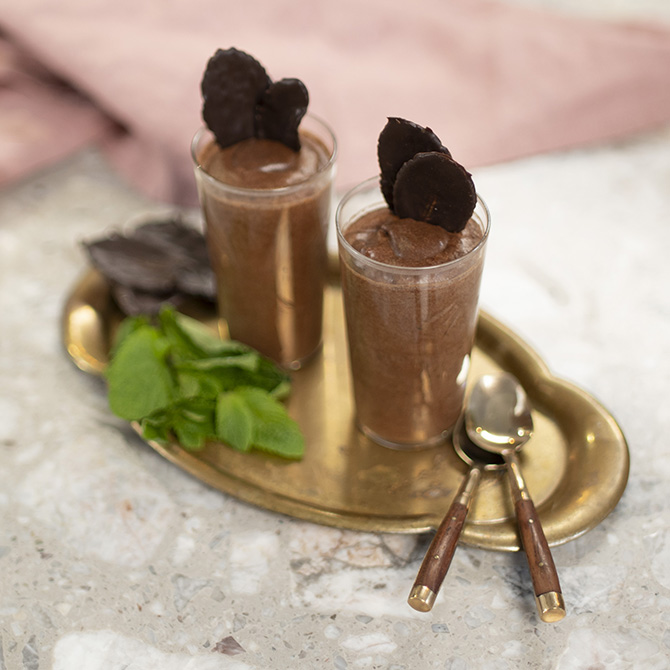
Speedy chocolate mousse with homemade chocolate mint decorations
Serves: 4-6
Preparation time: 15 minutes
Resting time: 2 hours
Cooking time: 10 minutes
Equipment: Whisk
Vegan, as long as using vegan-friendly chocolate
Ingredients
200g Dark chocolate, finely chopped
125g Aquafaba (chickpea liquid)
400g Tin of coconut milk
100g Caster sugar
½ tsp Lemon juice
Pinch of salt
Chocolate dipped mint leaves:
200g 70% Dark chocolate, roughly chopped
20 to 30 Mint leaves
Method
1. Place the chocolate in a small, heatproof bowl on top of a pot with gently simmering water. Make sure the bottom of the bowl is not touching the water. Leave to melt, occasionally stirring. Once melted, remove the bowl from the pot and leave to cool slightly.
3. While the chocolate is melting, whisk the aquafaba in a large, clean bowl until frothy. Continue whisking while gradually adding half the sugar and the lemon juice. Once the aquafaba is very thick, white and fluffy set aside.
4. In another large bowl add the remaining sugar, open the tin of coconut milk and scoop out the top creamy part. Whisk with the sugar until fluffy.
5. Add half the aquafaba into the slightly cooled chocolate and use a silicone spatula to fold together in order to loosen the mixture. Gently fold in the rest of the aquafaba and coconut cream until the mixture is streak free, be careful to not deflate the mixture.
6. Divide between 4 to 6 glasses and leave to chill for at least 30 minutes.
Mint leaf decoration
1. Melt 150g dark chocolate in a heatproof bowl set over a pan of simmering water. You want it to reach 45°C on a thermometer. Once it reaches this temperature, immediately remove the bowl from the pan of water.
2. Gradually add the remaining finely chopped chocolate, stirring well between additions and allowing the chocolate to melt fully before adding more.
3. Once all of the chocolate has been added in, keep stirring until the temperature cools to 27°C. You can speed up this cooling process by setting the bowl of chocolate over another bowl of icy water and stirring vigorously until the chocolate has cooled to 27°C. The cooled chocolate must then be reheated to 31°C, and now it is ready to use.
4. Ensure the mint leaves are clean and completely dry. Dip each leaf into the melted chocolate and place on a baking paper-lined tray. Freeze until solid and garnish the mousse with them just before serving.
“Mousse au chocolat: A French classic. A dessert I learnt how to make properly when I lived in Paris. There are quite a few versions out there but I learnt eggs and chocolate will suffice. Entertaining nowadays requires me to more often or not come up with dishes that can fit with all the dietary requirements my guests might have. So, making a dairy-free aka vegan version that keeps all the guests happy comes in super handy.
“The chocolate mint leaves are a homage to those famous mint chocolates. As a kid, I thought they were the height of sophistication with my parents always serving them for dinner parties in the ’80s.”
Rachel’s tips:
- This mousse has a hint of coconut. This can be replaced with traditional whipping cream for a more neutral flavour, although this will make it not suitable for vegans.
- Some brands of coconut milk won’t separate into a cream layer and liquid layer so try to choose brands which you know will separate. Sometimes chilling the can of coconut milk in the fridge overnight helps as the fat layer may solidify making it easier to scoop out. Otherwise you can buy cans of coconut cream and use those instead (you’ll need ~300g of coconut cream if you do this).
- Liquid from the can of beans is called aquafaba. Usually, the liquid from a can of chickpeas is used but it can be substituted with other bean liquid, though this may not be as effective.
- The mousse can be made a day in advance.
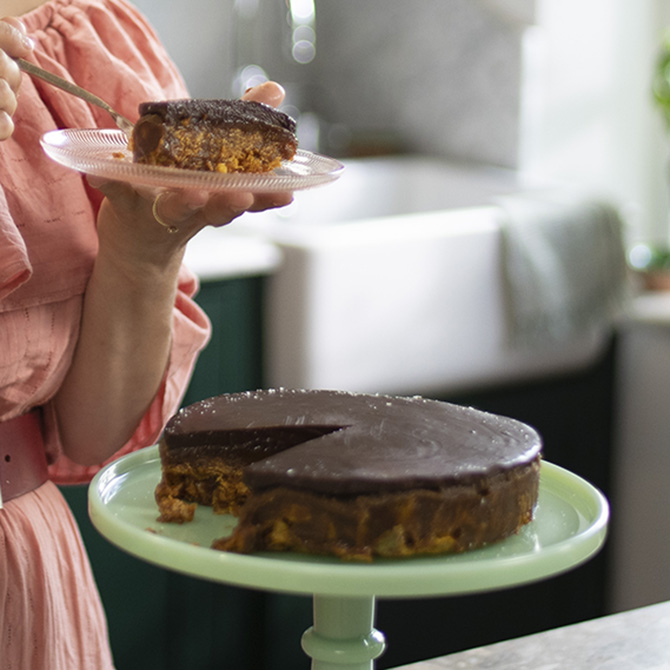
Tahini caramel chocolate truffle torte
Serves: 8-10
Preparation time: 15 minutes
Cooking time: 20 minutes
Setting time: 1 hour
Equipment: 20cm Cake tin lined with baking paper
Gluten-free (double check the packaging on the cornflakes)
Ingredients
Tahini Caramel
300g Caster sugar
150g Unsalted butter
120ml Double cream
200g Tahini paste
160g Cornflakes or gluten-free alternative
Chocolate ganache
150g Dark chocolate, finely chopped
150ml Double cream
A generous pinch of sea salt flakes, plus a little for garnish
To serve
200g crème fraiche
Method
Caramel
1. Pour half of the caster sugar into a large, light-bottomed pan, making sure it covers the base.
2. Place on a high heat. When the sugar starts melting, sprinkle on the rest in the patches where it melts. Do not stir the sugar but swirl the pan.
3. When the sugar has reached a deep dark brown colour. Take off the heat and add the other caramel ingredients. Be careful as the caramel may splutter.
4. Whisk until combined and pour half of it over the cornflakes in a heatproof bowl.
5. Mix the cornflakes until well coated and pour into the cake tin. Press down so the base is even and completely covered (you want to avoid any holes).
6. Pour in the remaining caramel. Place in the fridge to chill and set.
Ganache
1. Bring the cream and salt to the boil in a medium pot. Take off the heat and leave to stand for a minute before pouring onto the chopped chocolate in a heatproof bowl.
2. Leave to stand for 5 minutes before stirring until the chocolate is melted.
3. Remove the torte base from the fridge and pour on the chocolate. Place back in the fridge for an hour.
4. Take out of the fridge at least 30 minutes before serving. Slice into slivers using a knife dipped into boiling water and sprinkle each slice with a little sea salt. Serve with a dollop of thick crème fraiche.
“Resourcefulness comes second nature to me and there’s nothing more I love than using up odd bits I might have in the fridge. On this occasion, it happened to be a rather sad looking jar of tahini. Everyone knows that nuts and chocolate go together like a horse and carriage—well, the same could be said of tahini and chocolate. The nuttiness from the sesame seed paste works fantastically well with the caramel and chocolate.
“This cake may look rather small but you really only need the tiniest slice. It’s almost like a chocolate truffle in cake form.”
Rachel’s tips:
- Tahini could be replaced with a sugar free smooth nut butter or if you don’t mind a chunky texture to your caramel, crunchy peanut butter.
- You could make the caramel another time to serve drizzled over ice cream or even an apple tart. You could fold the cooled caramel into buttercream to frost a layer cake. You could fold the cooled caramel into whipped cream and fill profiteroles with it.
- Using cornflakes here is like a cheat version of using feuilletine—a thin crispy wafer, broken into shards, which is used in French pastry. It’s hard to make at home and is very difficult to buy so cornflakes make the perfect crispy substitute. You could also use crushed up ice cream cones or wafer cookies instead.
- The torte can be made two days in advance. Keep in an airtight container in the fridge. Serve at room temperature.
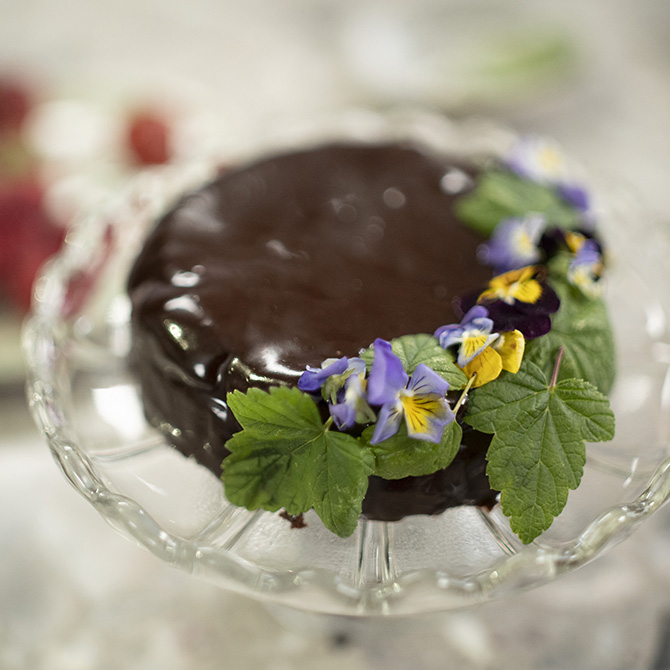
Easy chocolate cake with mirror glaze
Makes: 4 x 10cm cakes (or 12 muffin-sized cakes)
Preparation time: 30 minutes
Resting time: 1 hour
Cooking time: 20-30 minutes
Equipment: Electric whisk (or lots of muscles)
4 x 10cm cake tins (or a 12-hole muffin tin and paper cases)
Vegan, as long as using vegan-friendly chocolate & plant-based milk
Ingredients
240ml Milk or plant based milk
1 tsp Cider vinegar
80ml Vegetable oil
1 tsp Vanilla extract
Generous pinch of salt
170g Plain white flour
1 tsp Bicarbonate of soda
1/2 tsp Baking powder
50g Unsweetened cocoa powder
100g Granulated sugar
150g Apple puree (non sweetened)
4 heaped tablespoons of apricot jam or any other jam/marmalade of your liking
Mirror glaze
300ml Double cream or coconut cream
260g Caster sugar
110g Unsweetened cocoa powder
1 tbsp Liquid pectin
Pinch of salt
Decoration
Edible flowers, cake sprinkles, berries or slices of fruit
Method
1. Preheat the oven to 160°C fan (320°F/Gas Mark 4).
2. Mix the milk, cider vinegar, oil, vanilla and salt together in a medium bowl. It may split but this is fine.
3. Whisk until foamy. In another bowl whisk the dry ingredients together until well combined. Pour the wet ingredients and the apple puree into the dry ingredients and mix together just until there are no lumps. Do not over mix otherwise you will have a tough cake.
4. Divide the batter between the cake tins.
5. Bake for 25-30 minutes or until it comes out clean when you insert a toothpick or sharp knife into the centre of a cake. Leave to cool completely before removing from the tin.
6. Once the cakes are cold, remove from the tins and trim if they have a rounded top. Cut each cake in half horizontally to create two layers.
7. Brush off any excess crumbs and sandwich the two halves together with a tablespoon of apricot jam in between, spreading the jam out so it makes an even layer.
8. Place the cakes in the freezer for 30 minutes.
9. Meanwhile, set up 4 tins or upturned tall glasses onto plates (this will function as cake stands to glaze the cakes).
Mirror glaze
* Do this 25 minutes after placing the cakes in the freezer (step 9 above)
1. Whisk together all the glaze ingredients in a pot. Continue to stir, making sure to scrape the sides and bottom of the pan, until the mixture starts to boil. Boil for 2 minutes.
2. Pour the mixture through a sieve and use a spatula to push the glaze through this will remove any air bubbles. After this step, it’s important to work fast.
3. Remove the cakes from the freezer and place on top of the tins. Pour the chocolate glaze over the cake. Check the sides of the cake are covered. Do not spread the glaze as it will otherwise disturb the jam top.
4. With a clean slightly wet finger, wipe the chocolate drips off the bottom the cake. Quickly repeat with the 3 other cakes using the glaze in the tray if needed.
5. Transfer the cakes to a serving plate before decorating with flowers, berries or sprinkles.
“This cake is light and not overly sweet, making it a great vehicle for all different kinds of toppings and that’s where you can have some fun. You can make this completely vegan (or dairy-free/nut-free) depending on what toppings you decide to use.
“The shiny mirror glaze isn’t as heavy as a ganache or buttercream. Traditionally it’s made with gelatine but my recipe uses pectin, a fruit-derived gelling agent. The lightness of this cake relies on the reaction between the vinegar, bicarbonate of soda and baking powder. This reaction begins as soon as the ingredients are mixed, so it’s important to bake the cake batter quickly to ensure the cake rises properly.”
Rachel’s tips:
- The batter will make 12 cupcakes when baked for 15 to 20 minutes. Alternatively, you could make one large layered cake. Use two 20cm sandwich cake tins lined with baking paper. Bake for approximately 35 to 40 minutes or until a skewer comes out clean when inserted. Once cooled, you can sandwich together with whipped cream, jam or chocolate ganache.
- Excess glaze can be used as fudge sauce (on ice cream or warmed up and used like a chocolate fondue for dipping fruit/marshmallows).
- Use to make hot chocolate by stirring a couple of tablespoons of it into warm milk until dissolved.
- The cakes can be made a couple of days in advance and kept in an airtight container (un-iced). Alternatively, they can be tightly wrapped and frozen for several months.
For more recipes, click here.
| SHARE THE STORY | |
| Explore More |


