
Closet full of clothes you almost like? Or maybe just a bunch of clothes you’re a little bored with? You’ve come to the right place. I’m doing a little upcycle on two things in my closet that need a major update, and you’re welcome to join in the fun (virtually, of course).
If you’re lazy like me, a big project that involves pattern cutting and actual effort is probably not in the cards. So, if you’re looking for a project that doesn’t take up any brainpower whatsoever (watch TV while you do this!) then you’ve come to the right place.
Ahead are two extremely easy upcycles, perfect for a girl who’s trying to sustainably revamp her wardrobe with next to no effort.
Upcycle #1: Cropping 101
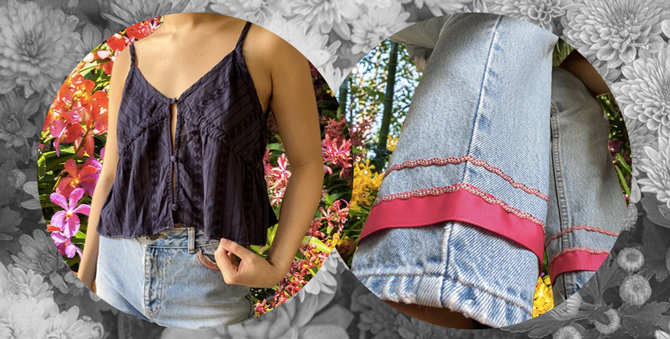
First up, we have this dress that I thrifted a couple years ago—it’s a strappy, summery dress that fits like a sack (a cute sack, but a sack nonetheless).


I love the pattern and the neckline, but the length and the cut of the dress make for an overall unflattering fit. So, the game plan here is to crop it into a cute little summery top.
TIP: You could also do the same thing to shorten a dress that’s too long, or crop a tee you already own.
Steps:
1. Assess the garment and figure out what you’re working with
This dress is riddled with problems—namely, the small issue of public indecency. There’s a huge gap between the buttons that leaves basically nothing to the imagination.


The previous owner has definitely made an attempt to rectify this little issue by sewing a modesty panel into the dress that runs from the first to the last button.
Unfortunately, the way it’s sewn on (in addition to the fabric of the panel being too stiff) means that it doesn’t quite lay right, nor does it solve the problem in the slightest. I can’t really be bothered to deal with it, so I’m just going to do away with it.
2. Seam rip any unwanted parts

Seam ripping was pretty easy—thankfully, the previous owner didn’t do a great job at securing the panel on (no offense, if you’re reading this). The stitch length was pretty long, which means that it wasn’t fastened onto the garment too securely. So, a few strategic chops here and there had it off in minutes.
3. Try it on and measure where you want to crop it
This is crucial—you don’t want to eyeball this and accidentally crop it too short. Likewise, there’s nothing worse than cropping and hemming, then realising you wanted it shorter after all. When making clothes for yourself, it’s important to keep trying and adjusting as you go.
4. Mark it, then add at least ½ inch of seam allowance to that
On the note of being diligent, please remember to add your seam allowance! Hemming doesn’t take a huge amount of fabric, but if you don’t leave any leeway for your seam you’re bound to run into trouble.
5. Cut the garment where you want to crop it

It may not look like much, but this is the hardest part of this whole process. Cutting in a straight line? Nearly impossible without a guide.
6. Press your hem
Don’t even think about skipping this step. No one likes a wonky hem. It’s simple—fold in ¼ inch of fabric from the edge and press it down. Then, fold in another ¼ inch to seal the raw edge in and press again.
8. Hem it
You don’t necessarily have to use a sewing machine for this; hand-sewing will suffice (though it takes forever) and, in a pinch, fabric glue works a treat.
However, I find that the perfect lazy-secure ratio is using a machine. Next to no effort, with guaranteed staying power. After working my round the hem, I decided to finish up and neaten the edges by hand.
TIP: Use a matching colour thread to hem, or use a contrast colour for a statement stitch (or if you’ve just run out of the right colour thread).
9. Finito!


Note: I’m saving the bottom part until I work out exactly what I want to do with it. For now, it will join my growing pile of scrap fabrics.
Upcycle #2: Trimming 101
Next up we have these jeans—they’ve been in my wardrobe forever, they fit great, they’re a good length and they’ve served me well. That said, after years of wearing them to the bone, I find that I’ve been using them less and less. Basically, I’m bored.

Also, they’re full of holes and rips—and not all of them are in trendy areas. Here’s some of my previous handiwork; the big hole by the crotch is currently being held together by a white, cotton patch. It’s not the most elegant patch-up, but at least my bum isn’t playing peek-a-boo anymore, ya know?

Anyway, I thought a fun way to jazz these bad boys up would be to add a fun accent to the bottom hem.
And before you say it—yes, I am aware that I’m ignoring the plethora of rips that actually need handiwork, but in my defense… I don’t want to. Let’s call it derelict chic, eh?
TIP: You can use this method to zhuzh up literally anything you can think of—denim jackets, skirts, T-shirts—go nuts!
Steps:
1. Try a few different trim combos and placements until you settle on one


I happen to have a real issue with hoarding trims and ribbons so this project is just perfect. I found two bits of ribbon and trim that I thought looked swell together, so that’s what I’ll be using for these cuffs.
2. Pin your trim or ribbon to your desired garment
I can’t stress this enough—pin your bits and bobs to your garments and make sure they line up perfectly when they meet. I’ve made this mistake too many times, where I’ll try to wing it, only to find that there’s a massive gap instead of a seamless finish.
TIP: Leave plenty of excess trim and/or ribbon hanging so that you don’t struggle to make ends meet when you’re done.
3. Handsew into place


Trust me—the cuff of your jeans (or your shirts, or your sleeves) is really finicky to get around your sewing machine. Plus, the delicate pink trimming I chose had little green flecks throughout, and I didn’t want to detract from the pattern by using a machine that I had no control over!
4. Repeat on the other side
Nearly at the finish line! Make sure you’re continuously checking back with the other leg to make sure everything is even stevens.
5. Voila!

I’m not joking when I say literally anyone could do these upcycles—it’s quick, easy and will give you wardrobe a second lease of life!

For more stories on sustainability, click here.
| SHARE THE STORY | |
| Explore More |


