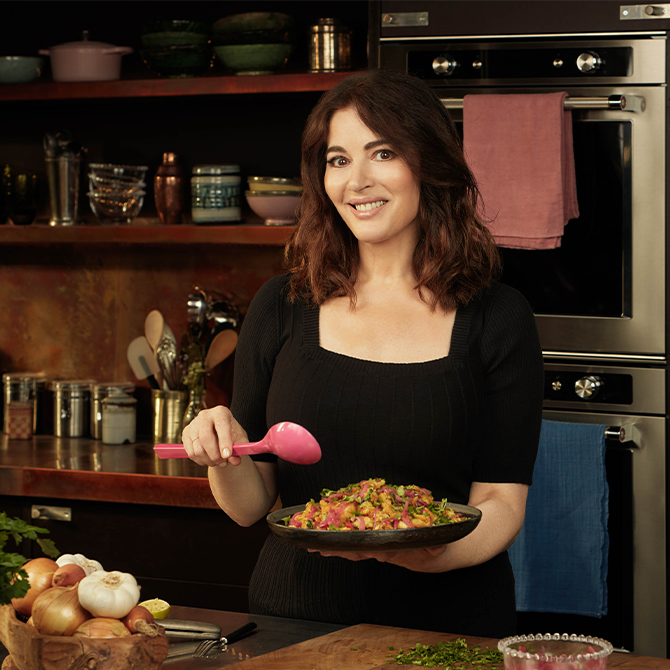

“More than just a mantra, cook, eat, repeat is the story of my life,” expresses celebrity cook Nigella Lawson. It’s also the name of her TV series, which takes viewers into the heart and soul of her cooking. Nigella’s Cook, Eat, Repeat delves into the rhythms and rituals of her kitchen by showcasing a delicious array of new recipes, each featuring her favourite ingredients. Through telling witty and insightful stories of each dish, she gets to the heart of how food provides our everyday lives with connection and joy.
Below are a few recipes from the show—so you, too, can create new memories through the transformative experience of cooking and eating!
Nigella’s Cook, Eat, Repeat premieres in Malaysia on Monday, 16th August at 7pm, on UnifiTV channel 512 and BBC Player. There are six episodes in total.

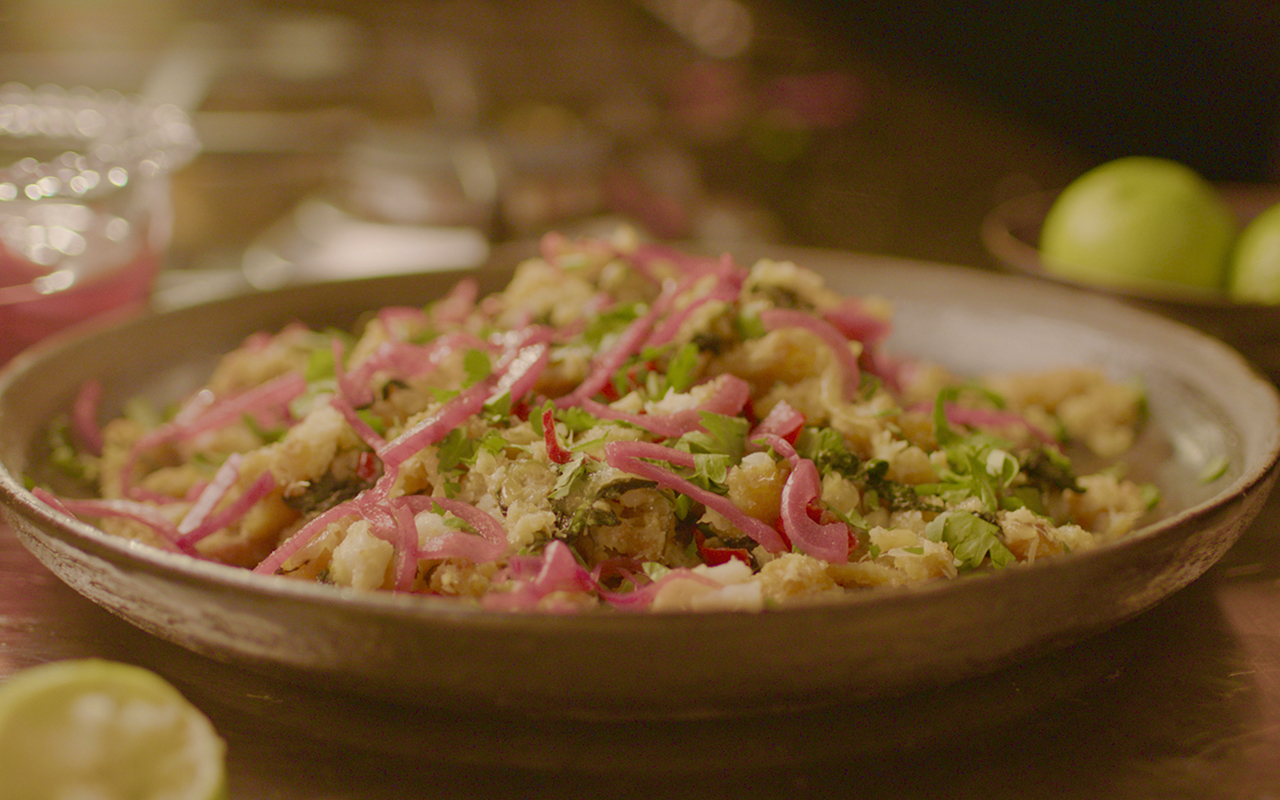
Fish Finger Bhorta
Serves: 2, with essential leftovers
Ingredients
For the pink-pickled onions:
1/2 red onion
Red wine vinegar or lime juice, to cover
For the bhorta:
2 regular onions (approx. 300g)
2 red chillies
2 fat cloves of garlic
1 x 15ml tbsp finely grated fresh ginger (approx. 50g chunk of ginger)
12 fish fingers
3 x 15ml tbsp cold-pressed rapeseed or vegetable oil
2 x 15ml tbsp English mustard (from a jar)
2 tsp sea salt flakes (or 1 tsp fine sea salt)
125g young spinach
1 lime
3 x 15ml tbsp roughly chopped coriander, plus more to serve
Method
1. Make your pink-pickled onions as far in advance as you can: at least 2 hours, and up to 24. Cut your red onion in half—or use a whole onion if you prefer, as you will easily find yourself adding them to much else—into fine half-moons. Put these into a jar with a lid, or simply into a bowl that you can cover. Pour over red wine vinegar (or lime juice), pressing down on the onions until they are all just immersed. Put the lid on the jar or cover your bowl, and leave the onions to steep.
2. When you’re ready to make and eat the bhorta, heat the oven to 220°C/200°C fan. While you’re waiting, peel and slice your 2 regular onions into fine half-moons, de-seed the chillies (or not if you prefer) and slice them finely, and peel the garlic. If the skin is tough, peel the ginger (using the tip of a teaspoon) then grate it finely to give 1 tablespoonful.
3. When the oven’s hot, and your ingredients are assembled and ready, put the fish fingers on a baking sheet and cook for approximately 20 to 25 minutes, which may be slightly longer than the packet directs, but will ensure the breadcrumb coating is really crisp.
4. Meanwhile, warm the oil in a large frying pan (I use a wok-shaped stir-fry pan), and cook the onions over medium-low heat for 15 to 20 minutes, stirring regularly, by which time they will be pale gold and soft.
5. Add the sliced chillies, stirring all the while, for 3 minutes. Then stir in the grated ginger, mince or grate in the garlic, and cook, still stirring, for another 2 minutes. Spoon in the mustard and salt, stirring to combine, then add the spinach leaves and let them wilt in the pan, stirring regularly, for 2 to 3 minutes. Then, squeeze in the juice of the lime.
6. Take the pan off the heat while you get the fish fingers. Break them up a bit with a spatula and then add them to the wok or frying pan. Toss everything together, breaking them up further, and sprinkle over the coriander.
7. Serve topped with the pink-pickled onions, adding extra chopped coriander if wished.
“I am so grateful to the political journalist Ash Sarkar for this new love in my life. I have to say I had never heard of it before I saw a tweet of hers in April 2019, which read:
‘Nostalgia in a dish: cooked fish fingers, mashed with onion, fresh ginger, and green chilli that’s all fried in mustard oil, stirred through with a bit of English mustard and finished with lemon and coriander. Bird’s Eye bhorta is to me what a tea-dipped madeleine was to Proust.’
Nigella’s tips:
- This dish says something so fundamental about what cooking is, about how we adapt to ingredients that are new to us, and make them part of ou lives. Authenticity is a much overused, indeed much misused, word in cooking in life generally, come to think of it. Honest borrowing is the natural province of the cook, and recipes are living, evolving entities.
- The pink-pickled onions which I bring to the party, are not mandatory but an addition I would be unwilling to do without. However, for all that they’re quick, they’re not instant. You can simply steep the onions in red win vinegar (not the expensive kind) a couple of hours ahead, but longer is better. I plan to do this six hours ahead, or the day before, although I try anyway to keep a rolling stock of them in the house.
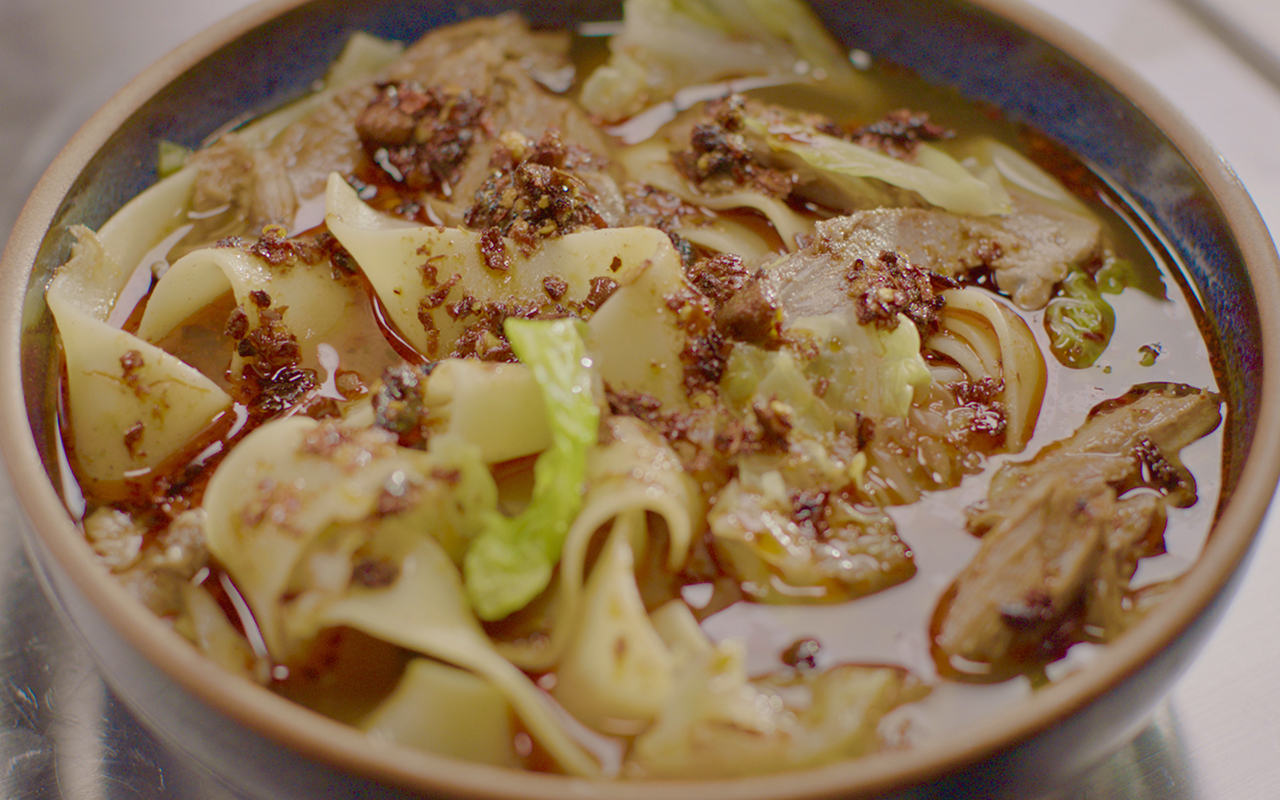
Wide Noodles with Lamb Shank in Aromatic Broth
Serves: 2 lucky people
Ingredients
1L cold water
1 x 15ml tablespoon gochujang paste
2 tsp sea salt flakes (or
1 tsp fine sea salt (plus more for pasta and cabbage)
1 tsp allspice berries
1 tsp cumin seeds
1 star anise
1 lamb shank
25g fresh ginger
1 carrot (approx. 125g)
2 fat cloves of garlic
70g banana shallots (2 smallish or 1large) or 1/2 an onion
200g Savoy cabbage
175g pappardelle (not egg pappardelle) or other wide noodles
To serve:
Chilli crisp oil
Method
1. Heat the oven to 150°C/130°C fan. Pour the litre of water into a small casserole with a tightly fitting lid (I use one of 20cm diameter) and stir in the gochujang paste until dissolved, then add the salt, allspice, cumin seeds and star anise. Now add the lamb shank to the pot, and put over medium heat.
2. Cut the ginger into coins and add to the pot as well, along with the carrot, peeled (if you want) and cut into four; the garlic cloves, bruised with the flat of a wide-bladed knife; and the shallots, cut in half, though there is no need to peel them. In fact, I don’t bother to peel anything. Once everything’s in the pan, the lamb shank should be just covered. If it isn’t, add some more water.
3. Once it’s come to the boil, clamp on the lid and cook in the oven for 2 to 2½ hours, by which time the meat should be very tender indeed, and ready to fall off the bone.
4. Using tongs, transfer the lamb shank to a large-ish bowl, then strain the liquid. Leave to cool, then refrigerate overnight.
5. The next day, remove the solidified fat, and shred the meat—not too finely, you don’t want stringiness—into a small saucepan, pouring over the liquid, and in another pan, large enough to take the pasta and cabbage, bring water to the boil.
6. Shred the cabbage. When the water’s come to the boil, add salt, and turn the heat on very low under the pan of lamb and its broth, so that it warms gently, though you do want it to be piping hot by the time the pasta and cabbage are cooked.
7. Add the pappardelle to the boiling salted water and when it’s 3 minutes away from its full cooking time (check the packet for instructions) add the cabbage and stir well. When both cabbage and pasta are cooked, drain, then divide between two noodle bowls.
8. Using a slotted spoon, lift out the hot lamb and share between the two bowls, then ladle the broth on top. If you have any of the crispy chilli oil add 1 teaspoon or so to each bowl, and take both bowls to the table, making sure you come back for the chilli crisp oil, so you can add more as you eat.
“While I could never have a recipe in any book I wrote that I didn’t love inordinately, this is just one of those special ones that fill me with a sense of glad-hearted awe. It’s not too much to claim for it: it’s almost ridiculously easy to make—I relish the quiet ceremony of its slow-cooking preparation—and is both comforting and enlivening to eat.
“I don’t know how it came to me, but I think that a visit to Master Wei in London, with its glorious bowls of punchily spiced aromatic broth and handmade biang biang noodles, might have had something to do with it, even if not entirely consciously. I didn’t set out to replicate what I’d eaten there, but I was hungering for something to deliver up exactly that combination of chilli-hot intensity and shoulder-lowering serenity.
“And while I haven’t been cooking it for long, my children already ask me for it regularly when we’re planning an evening together. It’s bowl food at its best.”
Nigella’s tips:
- The gorgeous broth has to be made a day in advance (longer if you want), but it’s a very straightforward procedure once you’ve got the key ingredients in stock.
- Gochujang, that fermented Korean red chilli paste that provides rich, rounded depth as well as heat, is the magic ingredient here. I recommend you get it for adding both oomph and umami to chilli, shepherd’s pie, mayonnaise, soups and stews. Here, however, it simply makes for a broth of such complexity, you’d think a thousand and one exactingly calibrated spices went into it.
- If you can’t get hold of gochujang, I dare say a teaspoon of dried chilli flakes would serve as a stand-in; it certainly would bring the heat (stir miso into the broth before eating).
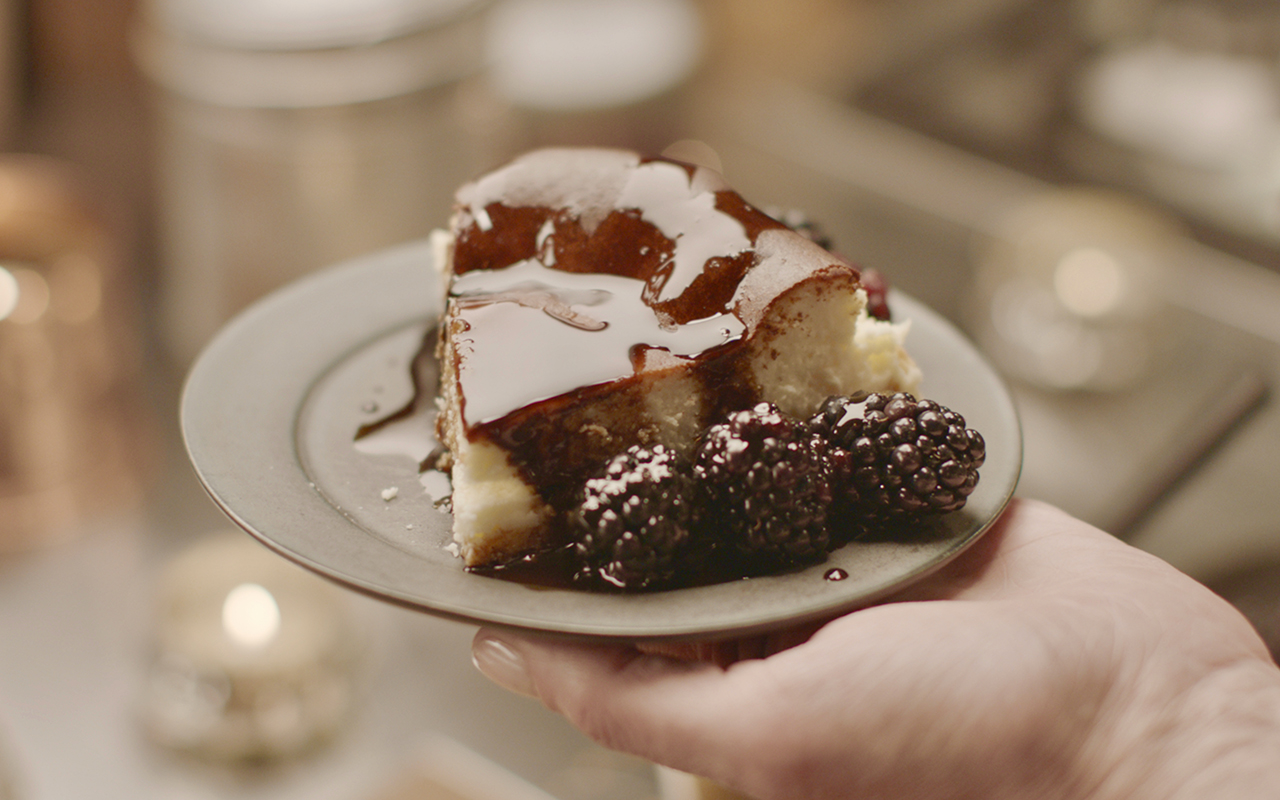
Basque Burnt Cheesecake
Makes: 8 to 12 slices
Ingredients
For the cheesecake:
600g full-fat cream cheese, at room temperature
175g caster sugar
3 large eggs, at room temperature
300ml sour cream, at room temperature
¼ tsp fine sea salt
25g cornflour
For the sauce:
15g hard pure liquorice pellets
90g caster sugar
300ml water
A pinch of fine sea salt (optional)
To serve:
Blackberries or other berries of your choice
Method
1. Heat the oven to 200ºC/180ºC Fan. Get out a 20cm spring form tin and a roll of baking parchment. Unfurl a long piece from the roll, and when it looks like you’ve got enough to line the tin with an overhang of 5cm to 7cm, tear it off and press it into the tin, and down into the edges at the bottom. Now do the same again with a second piece, placing it perpendicular to the first so that the tin is entirely lined. Push this piece down, too, and don’t worry about any pleats, creases and wrinkles; this is “the look”. Sit something heavy in the tin to keep the paper in place while you get on with the cheesecake mixture.
2. I use a freestanding mixer fitted with the flat paddle for this, but you could easily use a large mixing bowl, wooden spoon and elbow grease. First, beat the cream cheese with the sugar until light and smooth; I beat for quite a long time, certainly not under 2 minutes, and it would be at least 5 minutes by hand. It is absolutely essential—and I’m sorry to repeat myself—that the cream cheese is at room temperature before you start.
3. Beat in the eggs, one at a time, waiting for each one to be incorporated before adding the next, and when they’re all mixed in, you can—beating all the while—pour in the sour cream.
4. Once that is also incorporated, you can slow down the mixer a little (or risk getting cornflour all over yourself) and then beat in the salt, followed by the cornflour, one teaspoon at a time. Remove the bowl from the mixer, scrape down the sides with a silicone spatula, and give everything a good stir.
5. Pour into the lined tin (removing whatever’s been sitting in it, obviously), making sure no cheesecake mix is left in the bowl, and then lightly knock the filled tin on the work surface about five times to get rid of any air bubbles.
6. Place in the oven and bake for 50 minutes, by which time the cheesecake will be a burnished bronze on top, even chestnut brown in places, and it’ll have risen, like a dense soufflé. It will, however, still be very jiggly. It’s meant to be. You’ll think it’s undercooked, but it will carry on cooking as it cools, and it should have a soft set, anyway.
7. Remove the tin to a wire rack and leave to cool. It will sink in the middle a little, but that too is part of its traditional appearance. I reckon it’s cool enough to eat after 3 hours, although you may need to leave it for a little longer. If you want to chill it in the fridge, do, but not for more than 30 minutes.
8. Make the liquorice sauce once the cheesecake is out of the oven. If you have a bullet blender, you can pulverise the liquorice pastilles first, but whether whole or powder, put in a small saucepan with the 300ml of water. Stir in the sugar, then put on a lowish flame until the liquorice has all but dissolved, stirring to give it a bit of a nudge every now and again to help it melt. Then turn up the heat and let bubble away until reduced to 150ml—turning the heat down a bit if it looks like it’s boiling over. In a 14cm diameter pan, I find this can take up to 20 minutes. Keep checking—you’ll need a small heatproof measuring jug by your side. take Stir in a pinch of salt if finished leave to cool, when it will have the texture of a syrup, which in effect, it is.
9. Before serving, unclip and lift the sides of the tin up and away, and then lift the cheesecake up with the edges of the parchment. Place this on a board, and peel the paper back, and take it like that, rustically beautiful, to the table, along with your blackberries and even blacker liquorice syrup. Just drizzle a little over the slices of cheesecake as you hand them out, allowing hardcore liquorice lovers to spoon more over as they eat.
“I just can’t stop making this. A lover of all cheesecakes, in every one of their manifestations, I had—I must admit—neither eaten nor heard of this until a few years ago. It was created, in fact, about three decades ago, by Santiago Rivera of La Viña in San Sebastian.
“This is my version, and while I don’t have the wood-fired stove it was cooked in when I had my first taste of it, a hot oven at home creates it beautifully enough. It is, I should say, very easy to make. There’s no crust, it’s just a wodge of tangy cheesecake that, although burnt on top, is only barely set in the middle.”
Nigella’s tips:
- The hard thing is learning to take it out of the oven when it feels undercooked. At 45 minutes, in my oven at least, it is a disappointing pale gold; another five minutes, it appears suddenly, miraculously, burnished. But shake the tin and the centre of the cheesecake jiggles all over the place. It’s supposed to: despite your doubts and fears, take it out of the oven now; don’t give it a cautious further few minutes or it’ll set too firm and compact when it’s cold.
- Unlike most cheesecakes, this doesn’t need to stand in the fridge overnight before you eat it. In fact, it very much mustn’t, although you can sit it in there briefly, no more than 30 minutes, before you eat it.
Creme Caramel for One
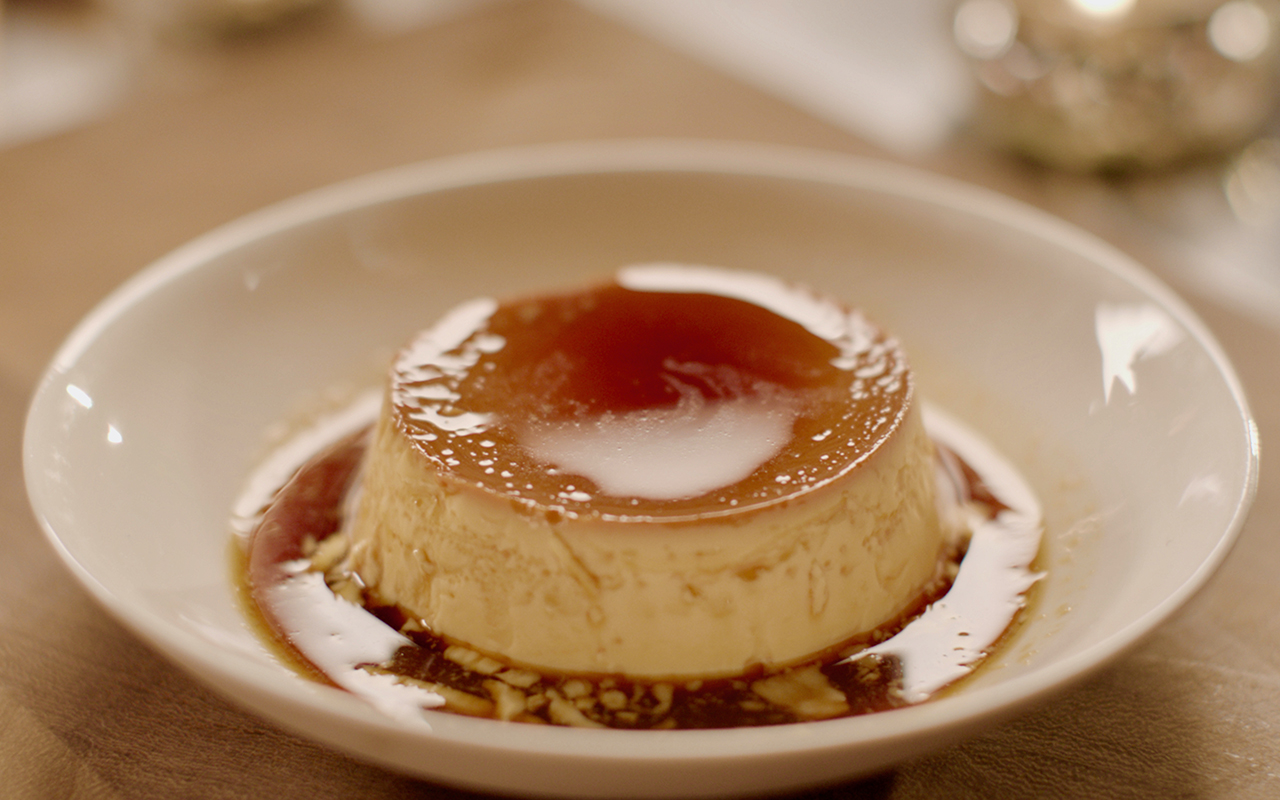
Serves: 1, blissfully
Ingredients
For the caramel
2 x 15ml tablespoons (25g) caster sugar
2 tsp cold water
For the creme
2 large egg yolks, at room temperature
2 tsp caster sugar
¼ tsp vanilla extract
150ml full-fat milk
Method
1. Heat the oven to 140ºC/120ºC fan, put the kettle on, tear off a piece of foil and cut out a square that’s 1½ to 2cm bigger than the diameter of the top of the dish or mould you’re using. When I first rushed to make this, I used a sweet little 200ml ceramic pudding basin that I must have bought once in a fit of cute, and found in the back of a messy cupboard. Fortune smiled: it was just right for the job. Otherwise, I favour preserving jars, drinking glasses or ceramic or glass ramekins; they all need to have a 200ml capacity and be heatproof.
2. Put your chosen mould very near the hob, and spoon the sugar into a very small saucepan with a light-coloured interior—I use my pixie-pan, more properly known as a butter melter, with a 9cm diameter, but a milk pan of about 14cm is just as good—and add the 2 teaspoons of water. Swirl the pan a little, then put over medium-low heat to melt the sugar and bring it to the boil, lifting the pan up and giving it a swirl every now and again. Don’t even think of stirring it.
Once the now-clear melted sugar starts bubbling away, you can turn the heat up a little, and then wait for it to turn first gold, then amber, then watch until it’s somewhere between maple syrup and chestnut; I like the caramel to be as dark and smoky as it can be without actually burning. Be patient, lift up and swirl the pan often and monitor it closely. Immediately once it’s turned the requisite deep amber, pour the caramel into the bottom of your mould, and now give this a swirl, just so the caramel goes a little up the sides. Place the mould in a small tin or ovenproof dish.
3. In a Pyrex jug or similar, briskly stir the egg yolks with the sugar and vanilla extract, just until combined. I use a small silicone spatula for this, as a whisk would get too much air into the mixture.
4. Warm the milk—I give it 40 seconds in the microwave—and then pour it over the eggs and sugar, stirring and scraping with your little spatula, making sure there are no visible yellow bits of egg left at the bottom. Strain this—you must not think of dispensing with this step—over your caramel-lined mould and then, with a teaspoon, carefully remove any bubbles or froth. Cover the mould with your square of foil, making sure it doesn’t touch the custard mixture, and seal it well all around the edges.
5. Pour hot water from the just-boiled kettle into the tin or dish to come about a third of the way up the mould, and slowly and steadily put it in the oven. Bake for 30 minutes, then lean in and very carefully remove the foil, and leave in the oven to cook for a further 20 minutes by which time it will be just set, with a little bit of a quiver.
6. Remove the tin from the oven and very carefully lift the crème caramel mould out of the water, and leave it on the kitchen counter until completely cold. Cover with food wrap and place in the fridge overnight, or for at least 6 hours.
7. Take the crème caramel out of the fridge 30 minutes before you want to eat it. Uncover, and with a very small palette knife, try very gently to pull the top of the soft-set cooked custard away from the sides of the mould. Fill a dish about 3cm deep with water from a just-boiled kettle, or very hot water from the tap, and stand or dip the crème caramel mould in the water for the count of 5.
Sit a saucer or small lipped plate on top of the mould, turn it swiftly and firmly the right way up and give the smallest of shakes to help dislodge it. You will hear a muffled squelch as the crème caramel begins to slide out of the mould and onto its saucer. Gently remove the mould.
“Crème caramel is just such a ridiculous thing to be making for oneself; therein lies the gift of it. And then there’s the dreamy softness of the mild custard, the scorched syrup that counters it: eating it is a transporting experience. I know it’s customary to use both cream and milk in a crème caramel but to me it’s the delicacy, the lack of richness, of the custard that gives it its teasing elegance.
“And, it’s true, I used just yolks for it, rather than the more usual combination of whole egg and extra yolk, because that’s what I needed to use up, but I would never toughen the texture of a crème caramel with an egg white again: this version is so exquisitely tender, its set so soft, it’s like a whisper on the lips.”
Nigella’s tip:
- The water bath is routine enough, but covering it for the first 30 minutes it’s in the oven helps it cook more gently still, as it protects the top from even the low heat it bakes at. It does need to be uncovered for the last 20 minutes, though, or else it won’t hold its form when unmoulded later.
Lemon Blossom Cocktail

Ingredients
2tbsp/30ml limoncello
2tbsp/30ml vodka
2 tbsp/30ml undiluted elderflower cordial
2 tbsp/30ml lemon juice
Ice
Method
| SHARE THE STORY | |
| Explore More |


